One of my friends has suggested a fantastic idea for my next post. Her question?
HOW DO I PACK MY BACKPACK?!?
To roll or to fold?!
It really does take you a while to work out an efficient and effective packing system for your particular backpack, so maybe I could give you a head start with my well tested methods. I've found a fantastic space saving way to pack my clothes, and I used this method for my last 10 month trip, while backpacking Canada, the USA, Peru and New Zealand - and (*cough* without bragging too much)... I reckon it's probably the best way to pack your bag, whether you're away for a few weeks or many months.
I am THAT dedicated to helping you guys out, I even went to the effort of whipping out my trusty Macpac to model for you today - taking a bajillion photos of what I use to organize my crap and step by step instructions showing how I stuff it all in.
So lets get to it. Firstly you need to organize your money, cards and I.D. As you can see below I use a small shoulder bag and small wallet with ONLY the necessary cards. For me thats my license, prepaid travel card, hosteling membership, student/youth card and enough cash to get me through the day. All my important bank cards, extra I.D and backup cash (Can you spot the old-school $20?) and account information goes in my big travel wallet, which is hidden in my large backpack. This acts like my personal safe, and I only access it if I need to top up my little wallet with some cash for the day.


Next you want to sort your other important documents. I use a small waterproof document bag for my passport, flight tickets, visa information, and anything else important for making your way through the airport. I also have an extra plastic pocket where I keep photocopies of all my cards and passport, serial numbers of my laptop/camera, travel insurance documents and any other documents or maps. THIS NEVER LEAVES MY LARGE BACKPACK. It is my identity backup. I highly recommend for you to leave a copy of all your photocopied documents with a family member or close friend at home so if ...*touchwood*... all of your stuff gets stolen, or tips out of your canoe and disappears over a waterfall - at least you can still gain access to the specific numbers needed to prove your identity and be re-issued new documents while being overseas.


Another important thing to pack - necessary medication. I take a fresh box of panadol and cold and flu tablets and some bandaids. I have been sick a few times while traveling.. and TRUST ME - you don't want to be the half-dead zombie-looking foreigner traipsing down the street in search of cold and flu medication and playing symptom charades with pharmacists that don't speak english. I have done it twice in my travels and I really can't say it's something I'd like to do again. Ever. Anyway I keep everything in the small zip bag seen below. I got this particular one from my travel doctor - It was a self medicating kit for food poisoning (which can be common in South America). Thank god I never had to use it.

I've been using an old Katmandu towel bag to house all my laptop cords, camera cords, adapters, chargers and anything else electrical. If I'm not using my hard-drive this goes in this bag too, otherwise ill keep it in my laptop case.


Lastly, your two most important devices! A compact laptop and digital camera. I always keep these items in my day pack while traveling - especially when flying. The last thing you need is a broken laptop from being bashed around amongst the other check in luggage. I invested in an 11.6 inch Macbook Air for $800 off eBay and it has been absolutely fantastic. Highly recommend it. Oh and can't forget a phone (which was unable to model today as was too busy photographing everything!). I brought a prepaid iPhone and an Otterbox case.

So that concludes the first part of my packing process. Here is everything 'important' ready to be packed.

Now all the important stuff is out of the way, time to move on to my best kept packing secret....
... ZIP LOCK BAGS!! Nope, not even joking. They are the bomb!
STEP 1 - Pile of clothes vs large zip lock bags.
Sort all your clothes into bulky and non bulky items. If you're not sure what that means, basically one pile of stuff that wont fit into plastic zip lock bags after being rolled up and one pile of stuff that will.

STEP 2 - Perfecting your rolling skills
Fold the item so it's the width of your ziplock bag. Roll each item individually and as tightly as you can.


STEP 3 - Perfecting your stuffing skills
Shove your tightly rolled item into the ziplock bag. Repeat steps 2 and 3 until your bag is full (usually about 5 items). Then zip your bag till it is nearly closed, lay it flat and push out as much air as you can. I've found kneeling on it is the best way to get the air out. Then zip up the rest of the bag so it is airtight.


You can't really tell from the photo below, but pushing the air out has had a vacuum effect, making the items a fraction of the size they were before. Pretty freaking clever aye ;)
On the right are all my clothes ready to be packed. Bulky items like jackets, jeans and jumpers on the left. I will roll these separately and pack them wherever they fit best in my backpack.


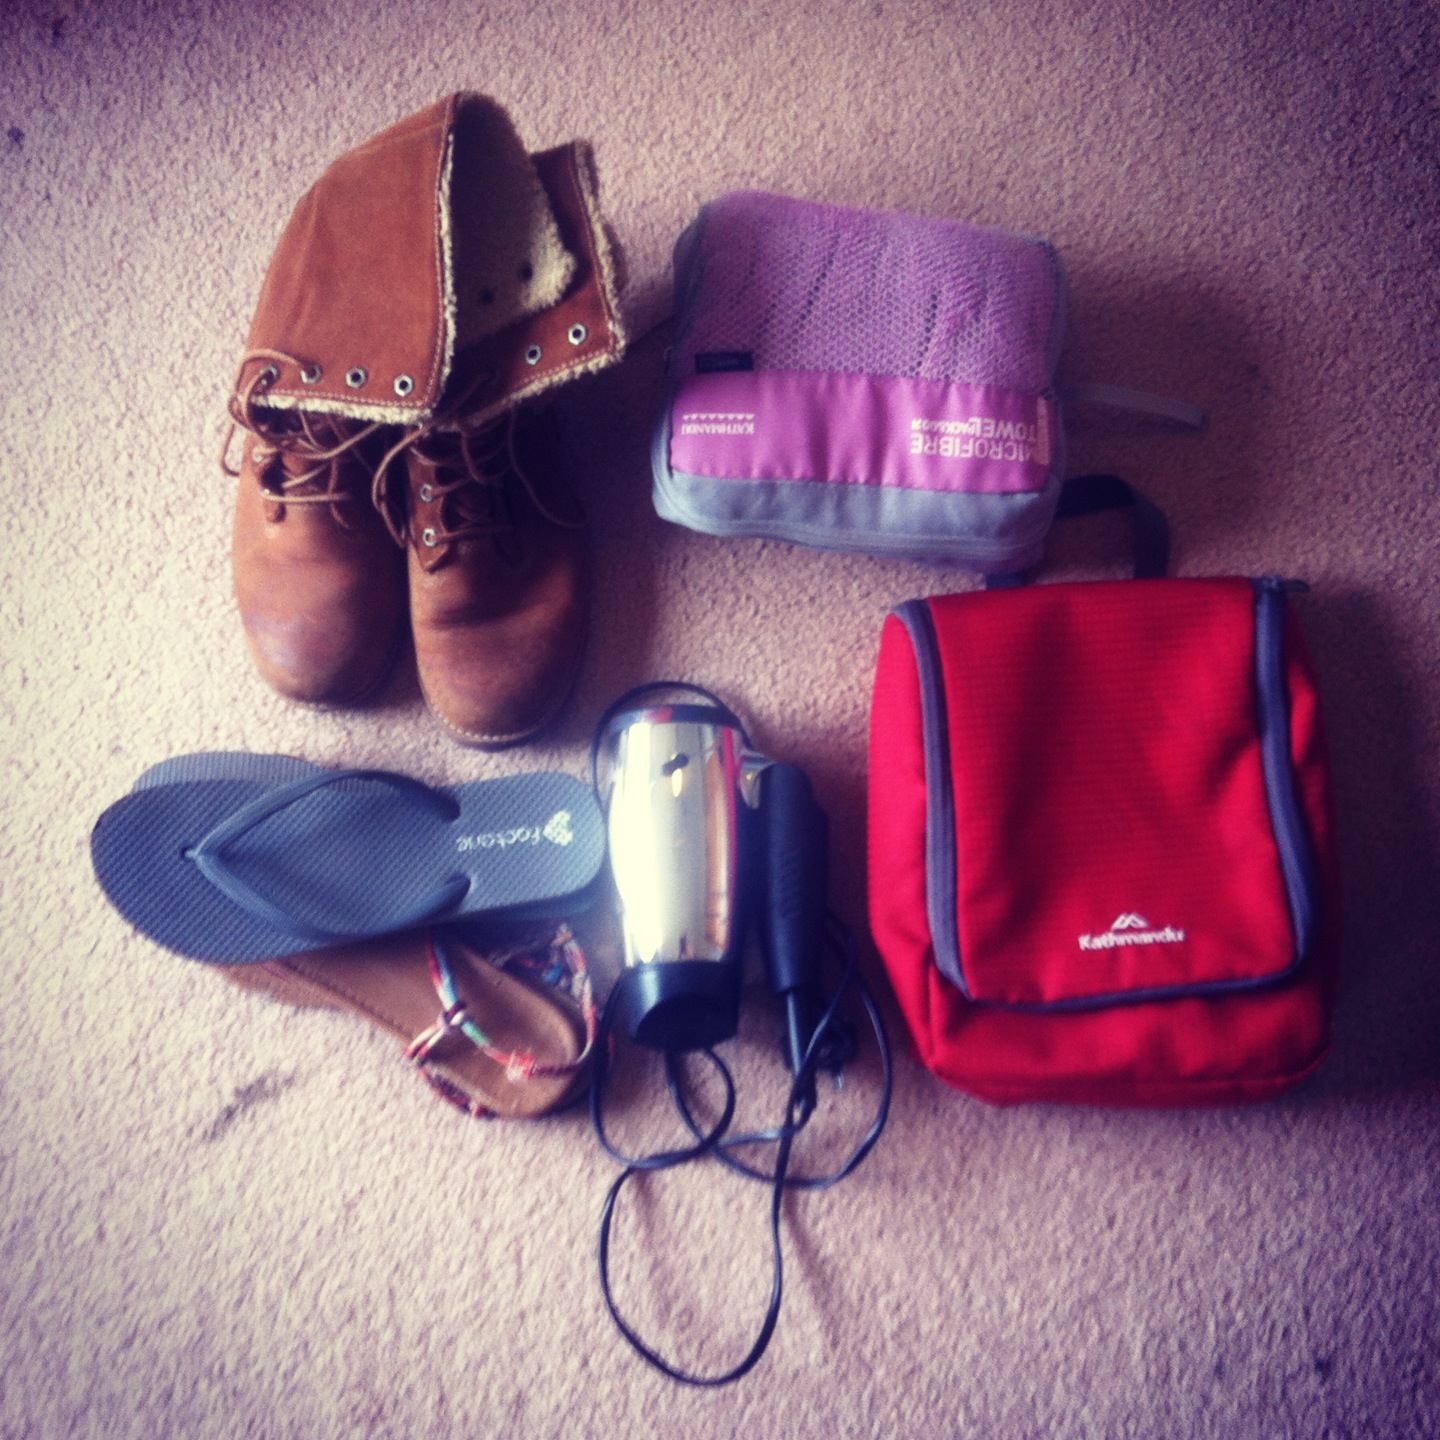
Here are the last items to be packed, my towel, shoes, hairdryer and toiletry bag. My sleeping bag was a bit camera shy, but he should have been in this photo too. Although, a sleeping bag (believe it or not) is an unnecessary item if you are planning on just staying in hostels - most of the hostels wont let you use your sleeping bag for fear of transferring bed bugs. I brought my sleeping bag in Toronto for $80, halfway through my 10 month trip and only ended up really using it when I was camping in New Zealand for 2 weeks.. so my recommendation would be don't take one - they are pretty cheap to buy if you really need one.
NOW FOR THE BEST PART.. fitting your life into a 70L backpack.
Meet the inside of my beloved Macpac.

1. Bottom first.
I always pack the bottom of my pack first, mainly because I prefer to fill this section with bulky items like shoes, my sleeping bag, my hairdryer and other things that wont conform as well as clothing. Fit as much as you can in this section and zip it up.

2. Lower middle section
Next I pack my ziplocked clothes. I've found putting them sideways and shoving them to the bottom of this section is the best way to fit them. I'll shove anything else that can fit between them, such as my waterproof jacket you can see below.

3. Upper middle section and bulky rolled items.
Now I puzzle the rest of my clothing in, and my toiletry bag.

4. Compression straps.
To create even more space, I clip and tighten the compression straps as tight as they go. You can clearly see the difference this makes! I've got heaps of room to fit in stuff down the sides of the pack if needed, and usually food will take up that extra space if I'm on the road.

5. Important stuff.
Choose a designated area to hide all your important documents. In my backpack, there's an awesome zipped section underneath the lid. I place my brown travel wallet, plastic folder with photocopies, medication, and my waterproof document case containing my passport. If I'm at the airport, I will have the case containing my passport and flight information in my day bag.

6. Zip and lock everything.
Make sure you buy TSA approved locks, so airport security can open the locks without cutting them if they need to. I'd also recommend buying combination locks - and place them on any zips that you will be in and out of regularly. It's a lot less hassle remembering codes as compared to having to find your keys all the time.

7. Daypack
Meet my little detachable Macpac daypack. In this I pack my laptop, keys to locks, my camera and my shoulder bag containing only what I need for the particular trip I'm making, e.g. from the airport to the hostel, or from one city to the next. If I'm at a hostel and just need to duck down the street, I'll use my shoulder bag and keep everything else locked up in a locker at the hostel.

8. Voilà! Finished!
Everything is ready to go, and I still have plenty of room for the collection of random foreign clothes and souvenirs during my trip. On my last trip, my pack weighed roughly 15kgs to give you an idea, and I didn't take much more then what I've showed in this post. My little daypack has clips that clip to the shoulder straps, allowing the bag to hang in front of me when I'm on the move. I've found this to be the lightest and most comfortable way to travel, as the weight of the pack was distributed evenly over my shoulders.

I hope this has provided some helpful information and handy tips to help you utilize as much of that 70L capacity in your pack as you can! If you have any other tips you can add, please don't hesitate to share!!
Want to find out tips on buying the right backpack? See my checklist and advice here
- Kobie
14 comments:
Thanks Kobie! That was just what I needed...glad I could provide you with an idea. ;)
No worries Erin! Just happy I could help you out on this one! Hope you have an awesome trip! Thanks again for the idea =D
Great tips! I'm always too lazy to use the ziplock bags for my clothes but your photos have me convinced!
Another thing on travel documents.. aside from keeping a set of copies in my pack (and one at home with a family member) I also scan and upload them on my email drafts so if something happens I can always print them out at the nearest cybercafe.
You have a great blog! I love it. Keep it up! ^^
Thanks Heidi! Haha I'm glad I have convinced you.. its the best way to know whats dirty and whats clean haha.
That's an awesome tip, I forgot to mention I keep a copy on my portable hard drive and laptop but email drafts is 10 times better! Thankyou so much for sharing =)
I came across this blog randomly and so glad I did! Leading up to a 4 month SE Asia backpacking adventure and been racking my brain on how much to pack and how to pack it in, the review of macpac was awesome too! Thanks so much!
Oh wow Carly that sounds like an amazing trip! I recently did a couple of weeks in SE Asia!
I could email through some packing advice if you want, but if I was to do it again I'd be packing bare minimum and buying stuff over there! The clothes markets they have are fecking awesome (my favourite shopping was in Pai) and everything is soo ridiculously cheap (I was in Cambodia and Northern Thailand)
Just remember light airy clothes as you will be sweating 24/7. Email me if you'd like a hand and I'll try and write a list of what I'd pack or something!
Thanks for the kind words about my blog too! I'm glad it has helped!
Thanks
One of my favorite backpack brands :) You seem to have found a great way to make the most of the space! Congrats! :) However, this brand is not everybody's most favorite one, and it certainly can't fulfill everyone's needs. That is why I will suggest that you check out a list of some of the best backpacks available (including your beloved Mcpack) :) Here is the place: http://survival-mastery.com/reviews/best-travel-backpacks.html
Investing in a good (or the best that you can get) backpack is one of the foundations of a worthwhile backpacking. It is not just getting a backpack for appearance, the backpack should do the job and should be able to sustain the external elements. Nowadays, there are numerous reliable and trusted brands out there worth checking out as I did, and found some of the best here: http://backpackingmastery.com/top-picks/best-backpacking-backpacks.html
Just finished reading of your post. It seems you shared a complete story of my life. I do same as you described in this post. No dubt best water resistant backpacks are really helpful in carrying number of things in them.
Thanks a lot. I was looking for it. Well written post shared.
cheap Heathrow airport parking
cheap Luton airport parking
Nice post! This is a very nice blog that I will definitively come back to more times this year! Thanks for informative post. sprayground backpacks
It is essential to transport your guns, ammo and accessories from one location to another, especially if your passion for shooting has grown. Your gear should be safe and organized with enough space for your accessories, such as optics and ear protection. Range bags are a great solution. Range bags are designed to transport firearms safely and securely. There are many range bags on the market, so finding the right one for you can be challenging.
I feel blessed living in USA .Happy that I have visited all the top places on list and some of them multiple times
Post a Comment